
Summary
ServiceBox allows integration with accounting software. Our custom connector transfers all relevant data from ServiceBox to your accounting software of choice with the push of a button. It also supports two-way synchronization of jobsite and customer info back into ServiceBox. This article outlines how to configure ServiceBox with QuickBooks Online.
Step 1
Sign in to your ServiceBox site and navigate to your login name displayed on the top right corner > click on the dropdown menu and go to QuickBooks Online
(If you can't see QuickBooks Online, please contact us at support@servicebox.com)
Step 2
Click Connect to QuickBooks

Step 3
As you click on 'Connect to QuickBooks', this will navigate you to your Intuit login, where you will enter your login credentials for QuickBooks Online.

Step 4
As you log in, QuickBooks Online will ask you if you want to share your data with ServiceBox. Click Connect.

You will be navigated back to ServiceBox on the setup page (this is where we will configure the settings tab by tab within ServiceBox to match your QuickBooks Online data).
Step 5: Sales Taxes
QuickBooks Tax Code for Blank ServiceBox Tax – If you have a blank tax in ServiceBox, the system assumes it's a non-taxable item. Choose a tax code that is tax-exempt within QuickBooks Online. (The list of tax codes in the dropdown populates from QuickBooks Online and may differ for each client.)
Link Tax Codes – The tax levels you see on the left under ServiceBox (i.e. GST, PST, HST, Tax Exempt) come from your settings in ServiceBox. You might have added these during your initial setup meeting. Each ServiceBox tax level should match a corresponding QuickBooks tax code (e.g. GST to GST).

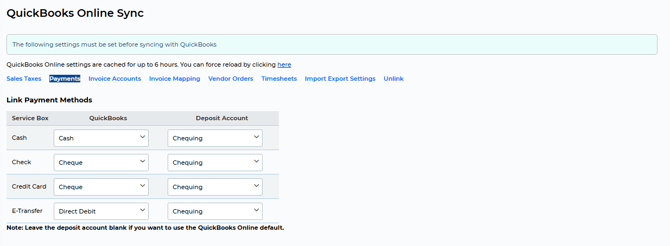
Step 6: Payments
-
Link Payment Methods – Match each ServiceBox payment method with the corresponding QuickBooks method (e.g. Cash to Cash, Check to Check).
To add a new method:
-
Go to Settings > Invoices > Payments
-
Add the new payment method
-
Refresh your page
-
Return to QuickBooks Online settings > Payments
-
Link the new method from the dropdown
-
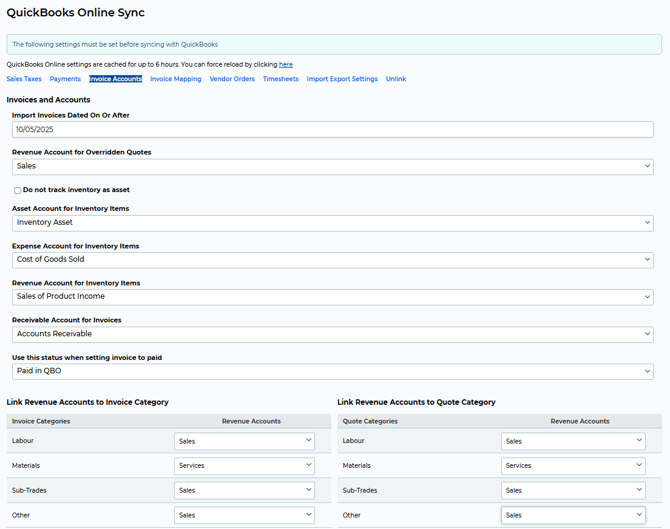
Step 7: Invoice Accounts
-
Import Invoices Dated On or After – Select the date you want to go live. For example, November 2, 2021. Invoices before this date won’t sync. You can change this date at any time.
For new users, we usually recommend choosing a date for the following week to give time for testing.
-
Revenue Account for Overridden Quotes – If you override pricing on a quote in ServiceBox, select which QuickBooks account to post that revenue to.
- Asset Account for Inventory Items – Choose where to track inventory purchases. Common options: Inventory or Inventory Asset. Even if you're not using inventory now, we recommend setting this.
-
Expense Account for Inventory Items – Choose the account to show the cost of inventory items (usually “Cost of Goods Sold”).
-
Revenue Account for Inventory Items – Select where sales revenue from inventory should go. This depends on your accounting setup.
-
Receivable Account for Invoices – Select your Accounts Receivable (A/R) account.
- Use this status when setting invoices to paid - You can choose Use Default, or "Paid". If you'd like to create an accounting-specific paid status for QuickBooks Online, review this article.
-
Link Revenue Accounts – Match each item category (Labour, Materials, etc.) to a QuickBooks revenue account. Quote and Invoice categories should use the same account.
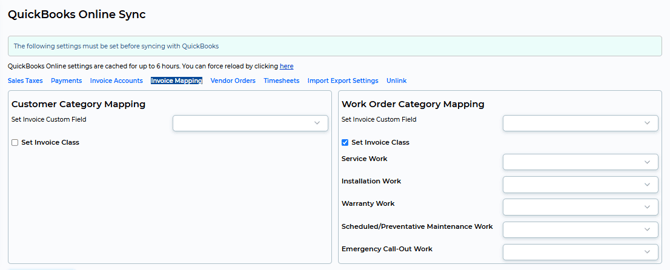
Step 8: Invoice Mapping
Link ServiceBox categories to QuickBooks class codes using the left and right columns.
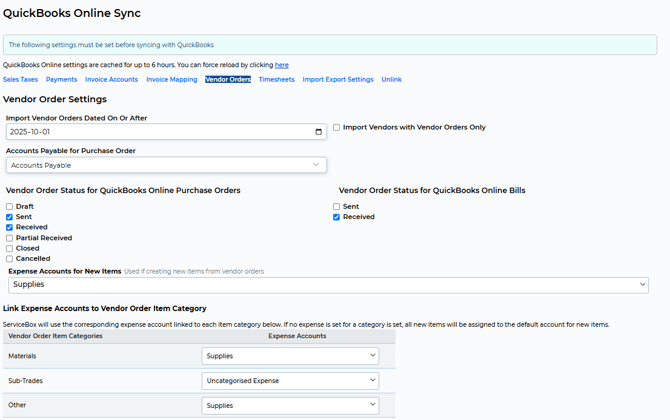
Step 9: Vendor Orders
Set parameters for importing vendor orders:
- Import Vendor Orders Dated On or After – Select the date you want to go live. For example, November 2, 2021. Vendor Orders before this date won’t sync. You can change this date at any time.
- Check Only Import Vendors with Vendor Orders if needed.
- Accounts Payable for Purchase Order – Select your Accounts Payable (A/R) account.
- Expense Account for New Items – Used for Vendor Orders. If a non-inventory item with a cost is created without a specific expense account, this setting determines which default account (like “Purchases”) to use.
- Vendor Order Status:
- Choose statuses for when Purchase Orders and Receipts/Bills are created in QuickBooks.
- Example: Ordered → PO, Received → Bill
- Once they receive the item, it's time to create a bill for that in QuickBooks, check the box labelled “Received”
- Columns on the left-hand side – Based on the status of the vendor order found in ServiceBox, the system will create a purchase order
- Receivable Account for Invoices – Select your Accounts Receivable (A/R) account.
- Link Expense Accounts to Vendor Order Item Category – Match each item category (Materials, etc.) to a QuickBooks expense account.
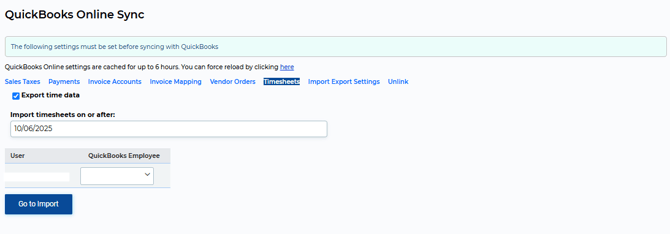
Step 10: Timesheets
By configuring these settings, you will be able to import Timesheet data from ServiceBox and add them into the QuickBooks Online Timesheet.
Check off where it says 'Export Time Data' if you would like to configure settings for timesheets, and leave it unchecked if you don't want to sync your timesheets.
After checking off the checkbox, you would have to fill in the date from when you would like to start importing timesheets into QuickBooks Online from ServiceBox.
Next would be to link the user within ServiceBox with the corresponding User/Employee in QuickBooks Online.
If you add a new user in ServiceBox, you would have to come to this page and link it with the QuickBooks Online employee name for that user's timesheet to be reflected in your QuickBooks Online.
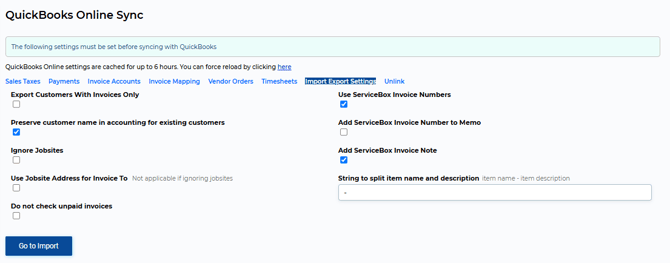
Step 11: Import Export Settings
-
Export Customers with Invoices Only – If checked, customers will only sync to QuickBooks when they have an invoice in Submitted or Paid status.
-
Preserve Customer Name in Accounting for Existing Customers – If checked, changes in ServiceBox won’t overwrite the name in QuickBooks.
- Ignore Jobsite – If checked, it skips importing job sites from ServiceBox to QuickBooks. This is useful if you already have Job Info set up in QuickBooks or want to keep invoices linked only to the main customer, not specific job sites.
- Use Jobsite Address for Invoice To – If checked, the jobsite address becomes the billing address.
- Do not check for unpaid invoices – If checked, it lets you bypass the validation process for previously paid invoices during synchronization.
-
Use ServiceBox Invoice Number – If checked, QuickBooks will use the ServiceBox invoice number.
-
Add ServiceBox Invoice Number to Memo – Only check this if you're not using the above option. Adds the ServiceBox invoice number to the memo field in QuickBooks.
-
Add ServiceBox Invoice Note – If checked, notes from your ServiceBox invoice will be included in the QuickBooks invoice.
-
String to Split Item Name and Description – Use a delimiter like space-dash-space (
-) to separate item codes and descriptions during import/export between ServiceBox and QuickBooks.-
To import items from QuickBooks, first, it is best to set up a delimiter to put between an item code and description. In QuickBooks, they usually have an item number and a description in separate columns. However, in ServiceBox, we can bind those so you can have item number -(divider) description. Since -(dash) is a special character in QuickBooks, what you would do here is put a space - space. So now if we move an item from QuickBooks to ServiceBox, it will put that dash or divider in and vice versa.
-
Step 12:
Once you have completed all these settings tabs, you will see other tabs. Select Go to Import at the bottom once all settings have been configured
To Export to QuickBooks Online and Import to QuickBooks Online, if you would like to learn how to import or export, read our other article.
Need Help?
If you have any questions or need support, please click the Help button in your ServiceBox account or email us at support@getservicebox.com.