
-
How to Set Up the ServiceBox Connector Program for QuickBooks Desktop
Efficiently syncing your ServiceBox and QuickBooks Desktop accounts ensures accurate accounting data and reduces double-entry. This guide walks you through the full setup process for the ServiceBox Connector Program.
Downloading the Connector
To begin, download the accounting connector by clicking on the "Accounting" menu under your username.
-
Right-click “Here” to download the program, or right-click and copy the link to paste into a new browser tab.
- Open in Incognito Window if you're having trouble downloading.

If you encounter any error messages during the installation, follow the on-screen prompts.
- Click on the three dots, select "Keep," and confirm the action to proceed with the download.

- Select the dropdown beside delete and select "Keep anyway."
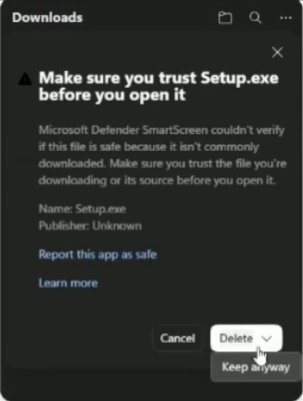
This step may vary slightly depending on the browser you are using (e.g., Edge or Chrome), but the key is to allow the installation to proceed.
-
By default, ServiceBox will download the connector program to your desktop.

Once downloaded, run the application and open it from your desktop.
Here's how to set it up
Step 1: Main Setup
Click the ‘Setup’ button on the top-right of the main screen.
In the first tab:
-
Enter your ServiceBox URL (e.g.,
yourcompanyname.servicebox.com/servicebox). No need to typehttps://. -
Enter your username and password for ServiceBox.
-
Click Test to confirm connection.
- Make sure to have your QuickBooks Desktop running in the background.
Under accounting connection:
-
Select either QuickBooks Desktop
-
Select the company file.
-
For Sage, also enter the username and password, and follow any security prompts.
As this is the first time you are running the connector, you need to grant it permission to open your QuickBooks file. If you go to QuickBooks and see this screen:
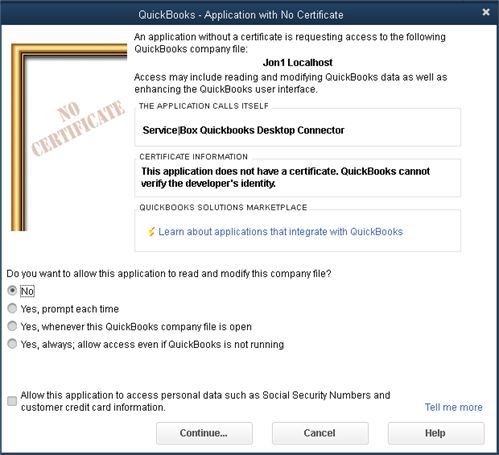
- Click one of the options starting with 'Yes'; the connector will continue the sync process.
Note: The last option will not require you to open QuickBooks before running the sync. This option will only work with the connector if the 'Keep QuickBooks running for quick startups' is set, because we require that QuickBooks be running to use the connector for performance reasons.
The setting appears in QuickBooks under the General tab in preferences, as illustrated below.

Once you are done,
-
Return to the Accounting Connector and hit "Test" your first tab should look like this:

Step 2: Customer/Jobsites Tab
There is no need to complete this tab.

Step 3: Tax Levels
-
Use the Non-Taxable Tax Code dropdown to select your default non-tax rate.
-
Link ServiceBox tax levels to your accounting tax codes by selecting a pair and clicking Link.
-
Unlink any mistakes by selecting the item in the list and clicking Unlink.

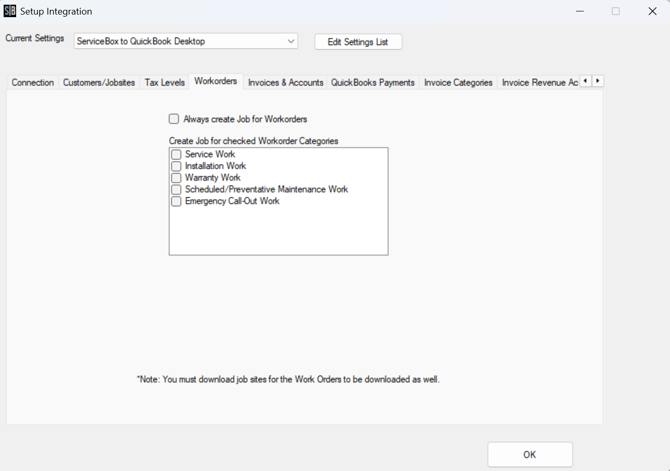
Step 4: Workorders
Select if you want to create jobs in your QuickBooks Desktop from Workorders created in ServiceBox. You can Select this to create all Workorders as Jobs or only create jobs for certain workorder categories.
Skip this step if you do not want this.
Step 5: Invoice and Accounts
-
Select a start date to avoid importing duplicate invoices.
-
Choose a default revenue account and receivables account.
If a matching item already exists in QuickBooks, that item will be used (and its revenue account) instead of creating a new one.
- Select "Do Not track inventory as asset if you currently do not track Inventory in ServiceBox or QuickBooks Desktop.
When finished with this tab, it should look like this:

Step 6: QuickBooks Payments
Choose how you want to handle payments:
-
Sync Automatically (recommended)
-
Do Not Sync Payments — enables manual entry with a helpful dialog showing paid invoices.

Step 7: Invoice Category
Link ServiceBox invoice categories to QuickBooks item types.
Examples:
-
Labour → Service
-
Material → Non-Inventory
-
SUB (Subtrades) → Other Charge
If you make a mistake, just click the item in the bottom list and click 'unlink'.
When you are done, this tab should look like this:

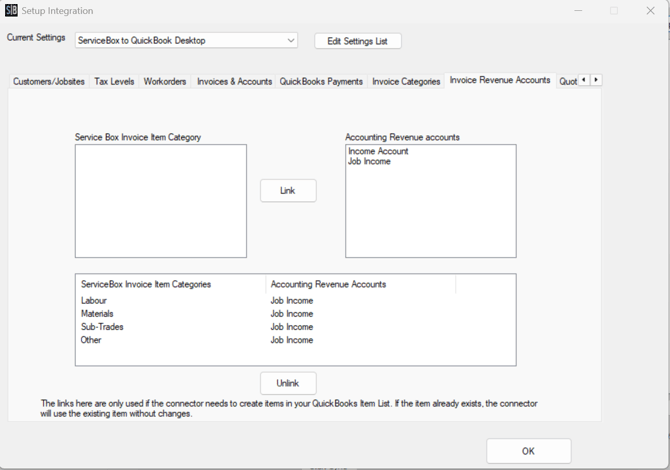
Step 8: Invoice Revenue Accounts
Link each ServiceBox invoice category to the corresponding QuickBooks sales revenue account.
Step 9: Quote Revenue Accounts
Same as invoices. Since ServiceBox uses a shared database for quotes and invoices, keep them aligned.
Overridden Quotes: Admins can set a specific revenue account when modifying a quote’s total.
For example, if you have a quote for $450, with the overridden quote feature turned on, admin users can change it to a lump sum of $500. The quote will still be considered valid and will eventually turn into an invoice, generating revenue for your business. The important aspect of this feature is that it gives users the option to select a specific revenue account to link the overridden quote
When you are done, this tab should look like this:

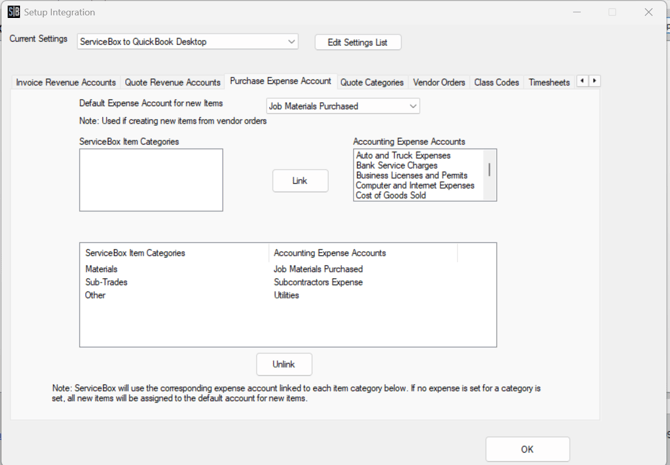
Step 10: Purchase Expense Account
Link each ServiceBox Purchase category to the corresponding QuickBooks expense account. Set a default expense account for new items.
When you are done, this tab should look like this:
Step 11: Quote Category
Link ServiceBox quote categories to QuickBooks item types.
When an invoice is based on a quote, the connector will download and (if applicable) prorate the quote based on the percentage of the quote that was invoiced with the current invoice. To do so, the connector may have to create items as it did for the invoice items based on the description. It uses the linkages on this tab to decide what type of items to create, as it did with invoices only this time with quote categories from ServiceBox.
To link the category to the item type, simply select an item in each of the two lists at the top and click 'link'. The newly linked item should appear in the list at the bottom. If you make a mistake, just click the item in the bottom list and click 'unlink'.
When you are done, this tab should look like this:

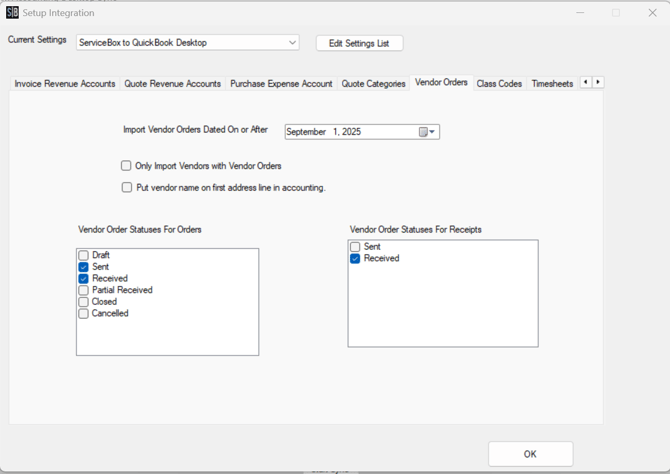
Step 12: Vendor Orders
Set parameters for importing vendor orders:
-
Import Vendor Orders Dated On or After — set your go-live date.
-
Check Only Import Vendors with Vendor Orders if needed.
-
Check Put Vendor Name on First Address Line for accounting preferences.
Vendor Order Status:
-
Choose statuses for when Purchase Orders and Receipts/Bills are created in QuickBooks.
-
Example: Ordered → PO, Received → Bill
Once they receive the item, its time to create a bill for that in QuickBooks, check to box labeled “Received”
Columns on the left hand side: Based on the status of the vendor order found in ServiceBox, system will create purchase order
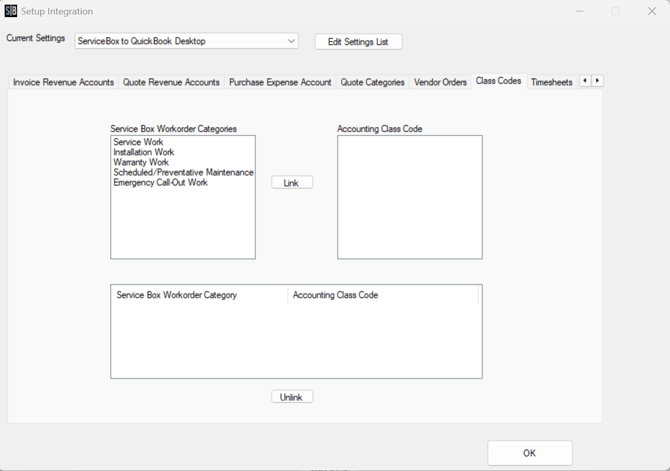
Step 13: Class Codes
Link ServiceBox categories to QuickBooks class codes using the left and right column.
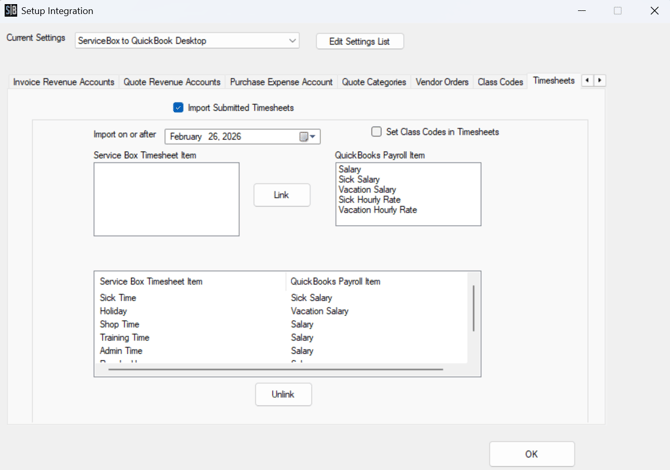
Step 14: Timesheets
To use ServiceBox timesheets with QuickBooks:
-
Enable Import Submitted Timesheets.
-
You must have payroll turned on in your accounting software
- Set an import date.
- Link ServiceBox items to QuickBooks payroll items.
Step 15: Payment Methods
Link payment methods from ServiceBox (left) to QuickBooks options (right). Linked options appear at the bottom.

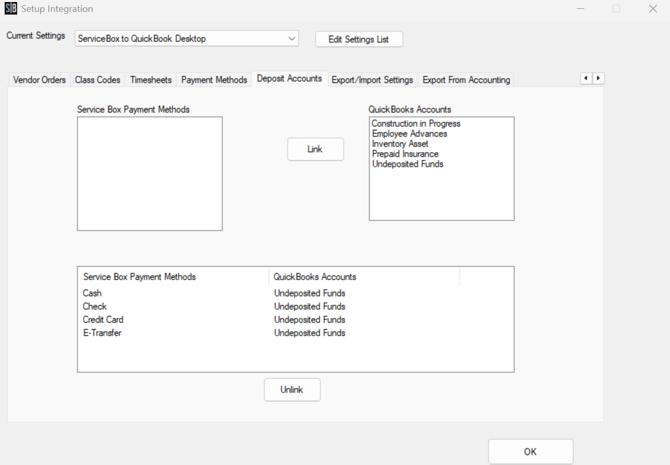
Step 16: Deposit Accounts
Link payment methods from ServiceBox (left) to QuickBooks deposit account for each means of payment. Linked options appear at the bottom.
Step 17: Export/Import Settings
The next step in the setup process is to configure what the connector will do and how it will do it.
Recommended settings:
-
✅ Preserve display name in accounting
-
✅ Use ServiceBox invoice number in accounting
-
✅ Put ServiceBox invoice number in memo (if not using SB numbering)
-
✅ Set Customer Tax Levels from ServiceBox
-
✅ Create a ship-to address for each jobsite
-
✅ Item name/Description delimiter: Use “ - ” for clarity
-
✅ Add ServiceBox Invoice Note to Memo
-
✅ Add Maintenance Notes to Detail (choose before/after line items)
-
✅ Use this status when setting invoice to paid — to reflect where the payment was received
Avoid enabling:
-
⛔ Do not check unpaid Invoices
-
⛔ Put customer name on first address line in accounting
-
⛔ Use jobsite addresses as Bill To
There are some settings that we can set in this tab
- Only import ServiceBox customers with invoices to accounting - This setting will only import customers into QuickBooks that have an invoice associated with them. Use this if you want to keep some customers in ServiceBox only.
- Append company name to individual name for import from ServiceBox - What this setting will do is if there is a first and last name (i.e., an individual) and there is a company name, then this will append the company name to the end of the individual name when put into QuickBooks. So if the name is Bob Smith and company is Bob’s Builders, then when put into QuickBooks it will be Bob Smith - Bob’s Builders.
- Preserve display name in accounting for existing customers: It is highly recommended to check this option as it ensures that no alterations or modifications are made to the customer's information in Sage.
- Use ServiceBox invoice numbers in accounting - If you want to use the QuickBooks numbers in accounting, but need a reference to the ServiceBox invoice number. Then check this off to add the ServiceBox invoice into the memo field for the invoice in QuickBooks.
- Do not check for unpaid invoices – If checked, it lets you bypass the validation process for previously paid invoices during synchronization.
- Preview customer actions before importing to accounting: Enable this setting to review the changes the connector will make to ServiceBox customers before they are applied. This gives you an opportunity to approve adding new customers or linking customers between the systems before the changes take effect. Changes to customers already linked in your accounting system will always be applied.
- Put Customer name on first address line in accounting - If your company has the customer name at the top off the address in the Bill To field in QuickBooks, then you need to check this off.
- Add ServiceBox Invoice Note to Memo: In ServiceBox, there's a place to add extra information or notes for an invoice called the "invoice note" field. If you want, you can transfer that information to a section in your accounting software called the "memo" field. When you choose this option, the description you entered in the invoice note field will be moved and shown in the memo field of the corresponding invoice in your accounting software.
- Use job site addresses as Bill To: Check this option if all customers have the same billing address as the job site. Otherwise, leave it unchecked.
- Set Customer Tax Levels from ServiceBox: Check this open if you want to match the tax levels (combinations of sales tax rates) defined in ServiceBox with the tax codes in QuickBooks . This is important because it tells the connector which taxes should apply to each invoice line when data is transferred.
- Create Ship To Address For Each Jobsite: ServiceBox automatically generates a unique ship-to address for each jobsite associated with a customer. This ensures that each location is recognized as a distinct destination in QuickBooks Desktop (QBD).
- Item Name/Description Delimiter: Users can now divide an item name and description when creating items in QuickBooks. If a user includes an item number, a separator, and a description, ServiceBox will automatically create a new item in QuickBooks. The QuickBooks invoice will display the item in two separate columns—one for the item name and another for the description.
- Attention Prefix: Enter in the attention prefix you would like to use when importing Attention Fields from ServiceBox to QuickBooks. For example, if you have Mike Smith in the Attention field for a customer you can enter in Attn: and when imported to QuickBooks it will display as Attn: Mike Smith in the address line 2 field.
- Add invoice notes to detail: When you click on the dropdown menu, it provides you with the option to choose whether you want to display the invoice note before or after the line items. This choice is entirely up to you and depends on your preference.
- Add Maintenance Notes to Detail: The "Maintenance notes" refer to the work-related notes that are included on the invoice. This decision determines the positioning of the maintenance notes when the invoice is transferred to your accounting software. For instance, if you have a note related to labor, you can choose to show it either before or after the labor line item. Generally, it is recommended to display it after the line items as it maintains a cleaner and more organized appearance. However, the final decision is entirely up to the customer.
- Use this status when setting invoice to paid: This determines what status will be assigned to an invoice in ServiceBox when it's marked as paid, either manually in ServiceBox or after syncing payment from QuickBooks Desktop.

Step 18: Export from Accounting (Optional)
Use this step to initially import customers and items from QuickBooks to ServiceBox. You will use this tab when setting up ServiceBox and importing Data from QuickBooks.
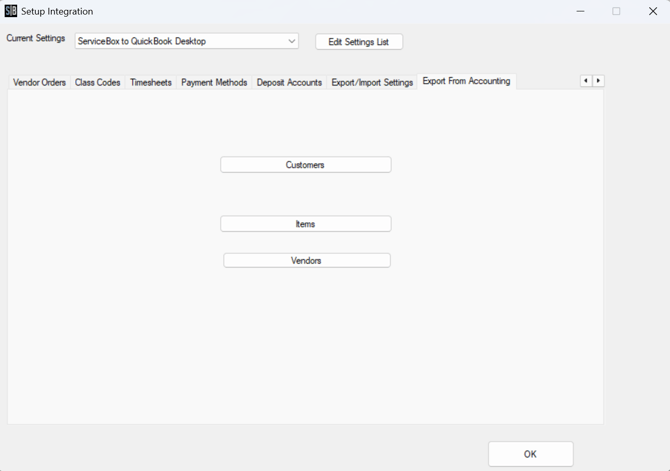
You have two options on this screen:
- Customers - Use this button to open up the import customers dialogue.
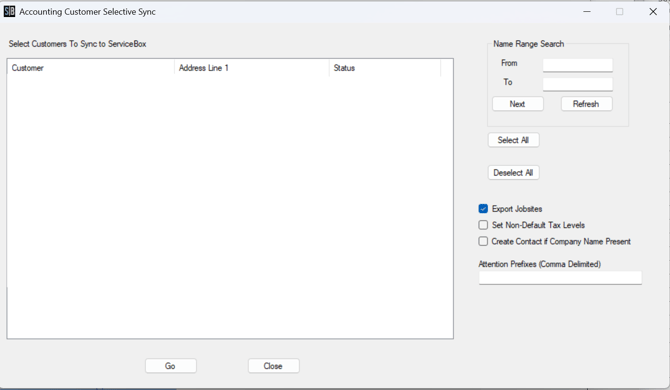
- Select All - This will select all checkboxes for customers on the left.
- Deselect All - This will deselect all checkbooks for customers on the left.
- Export Job Sites - If you check this off all Job Sites for customers will be imported to ServiceBox when the customer is imported.
- Create Contact if Company Name is Present - If you have a Company name and also the First Name and Last Name is entered for the company it will create a contact in ServiceBox for the Customer. Be careful though, if this is checked and you have an individual with a company name entered it will treat it the same way.
- Attention Prefixes (Comma Delimited) - During data setup it will be important to have address attention fields with an import indicator. So this field allows you to enter the prefix you have chosen. For example, if you have a company that has a primary contact of Mike Jones, when getting data ready for import you would enter Attn: prior to the name in QuickBooks. Before doing the Import input in Attn: to this field and all attention names will be imported into ServiceBox correctly.
- Items - use this button to open up the import items dialogue

- Select All - This will select all checkboxes for customers on the left.
- Deselect All - This will unselect all checkbooks for customers on the left.
- Export as Invoice Category - This includes all of the Invoice Categories that are in ServiceBox. Choose the Invoice category that you want to import items to and select the items you want to import and then click "Go". If you have Invoices linked to Quotes, then only use the "Export at Quote Category" dropdown.
- Export as Quote Category - This includes all of the Quote Categories that are in ServiceBox. Choose the Quote category that you want to import items to and select the items you want to import and then click "Go".
Once complete, your ServiceBox connector will be fully configured to sync with QuickBooks Desktop. This streamlines your invoicing, tax, and payment workflows across platforms.
Need Help?
If you have any questions or need support, please click the Help button in your ServiceBox account or email us at support@getservicebox.com.