
Summary
This document will help prepare your business to connect your QuickBooks Desktop company file with ServiceBox. It outlines various data scenarios and considerations when syncing QuickBooks Desktop with ServiceBox.
Synced Data
ServiceBox enables your company to perform the following with your QuickBooks company file:
-
Export Customers (and Job Sites) from QuickBooks: Typically done during the initial setup. Exported customer data includes:
-
Customer Name
-
Address Information
-
Phone Numbers
-
Website Information
-
Email Addresses. Etc.
-
-
Import New Customers and Job Sites Created in ServiceBox into QuickBooks: If a new customer in ServiceBox matches an existing customer in QuickBooks, ServiceBox will attempt to link the two.
-
Update Existing Customers: Once a customer in ServiceBox is linked to a customer in QuickBooks, all updates to the customer will sync from ServiceBox to QuickBooks.
-
Import New Invoices from ServiceBox into QuickBooks: This creates a new invoice in QuickBooks associated with the corresponding customer and job site from ServiceBox. All items and prices are imported as well.
-
Synchronize Payment Status:
-
If an invoice imported from ServiceBox is marked as paid in QuickBooks, it will also be marked as paid in ServiceBox.
-
If you are using Payments in ServiceBox, all payments will be imported into QuickBooks.
-
Integration
To set up the integration with QuickBooks Desktop, install the Accounting Connector on the computer where QuickBooks is installed. For more detailed information on the Accounting Connector setup, please refer to the official ServiceBox support article: QuickBooks Desktop - Integration with ServiceBox - Accounting Requirements and Setup.
Getting Started
Before importing customers (and job sites, if applicable) into ServiceBox, ensure that your QuickBooks Desktop data is clean and ready for synchronization. The following steps outline various data situations, what to watch out for, and potential changes to consider. We recommend updating the data before connecting ServiceBox to QuickBooks Desktop to expedite the setup process.
Preparatory Steps:
-
Backup Your Company File: Always create a backup before making significant changes.
-
Allocate Time for Data Processing: Set aside sufficient time to review and clean your data.
-
Follow Instructions Carefully: Adhering to these guidelines will streamline the ServiceBox installation.
-
Display Names: If you display customers using "Last Name, First Name," ensure the corresponding setting is enabled in the Accounting Connector.
-
Customer Name in "Bill To" Field: If you enter the customer name into the first line of the "Bill To" field in QuickBooks, enable the setting: "Put Customer Name on First Address Line in Accounting."
Recommended Settings for Companies
When adding a company from QuickBooks to ServiceBox, consider the following:
-
Customer Name: This is the only required field. If the Company Name is entered, it should match the Customer Name.
-
Additional Details: You can enter other details such as phone numbers, email addresses, and website information; all these fields can be imported.
-
Address Lines: QuickBooks allows up to three address lines. If you have an "Attention" line, it counts toward this limit, leaving only two lines for the address.
-
Customer Name in "Bill To" Field: If you include the customer name in the first line of the "Bill To" field, ensure the setting "Put Customer Name on First Address Line in Accounting" is enabled. The first address line must match the Customer Name.
-
Attention Line: To include an attention line in the "Bill To" field, prepend the name with "Attn:". Also, input "Attn:" into the "Attention Prefixes (Comma Delimited)" field in the Accounting Connector
Alternate Settings for Companies
If you wish to preserve the display name found in QuickBooks:
-
Company Name and Address Line 1: Ensure that the Company Name and the first line of the address match.
-
Display Name Variations: If you prefer a display name different from the company name (e.g., for numbered companies), adjust accordingly.
Recommended Settings for Individuals
When adding an individual customer from QuickBooks to ServiceBox:
-
First and Last Name: Enter both the first and last names, matching the Customer Name. If necessary, you can include a spouse's name in the first name field, but all fields must be consistent.
-
Display Names: If you display customers using "Last Name, First Name," enable the setting: "Use Last Name, First Name for Individual Display Name." Note that the "Bill To" field will use "First Name Last Name," not "Last Name, First Name."
-
Customer Name in "Bill To" Field: If you include the customer name in the first line of the "Bill To" field, ensure the setting "Put Customer Name on First Address Line in Accounting" is enabled.
Handling Company or Individual Names in Address Line 1
Note: Clarification needed from Jon on this section.
If you wish to preserve the display name found in QuickBooks:
-
Ensure Consistency: Make sure that the display name matches the first line of the address.
Possible Data Scenarios in QuickBooks
Scenario: Customer Name Does Not Match "Bill To" Address Line 1
If your company enters the customer's name into the "Bill To" field, it's essential that the Customer Name field matches the first line in the "Bill To" field.
Example:
-
Customer Name: "Quiznos Subs Albert St"
-
"Bill To" Field: "Quiznos Subs"
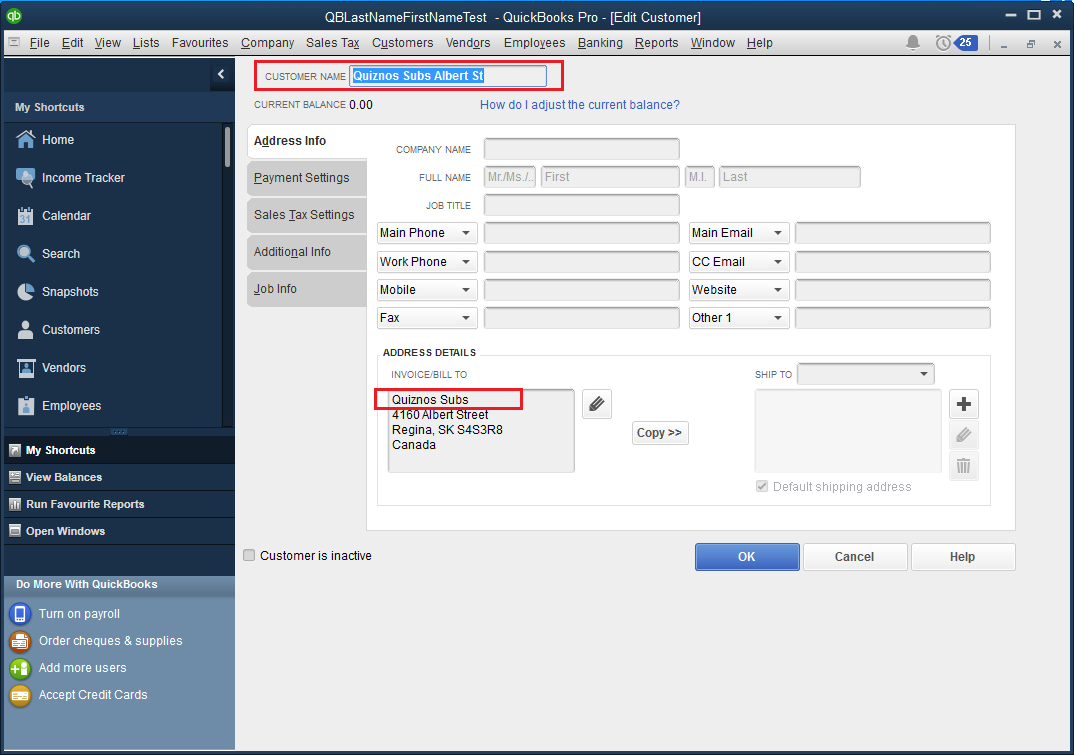
In this case, the address line one field of the "Bill To" will appear as "Quiznos Subs" during import, causing a mismatch.

Recommended Changes:
-
Ensure that the Customer Name and the first line of the "Bill To" field are identical.
-
Enter the same name into the Company Name field.

After making these changes, the address will appear correctly upon import.

Scenario: Individual Customer Without First and Last Name Entered
If you have a customer who is an individual, it's crucial to enter both the first and last names in the appropriate fields to ensure they are treated as an individual.
Example:
-
Customer Name: "Falconer, Todd"
-
Missing First and Last Name fields.
In this scenario, the customer will be treated as a company unless the first and last names are entered correctly.

When we go to import the customer from the Accounting Connector the name of the customer appears in the Address Line 1:

Recommended Changes:
-
Enter the first and last names for the customer.
-
Ensure that the first and last names in the "Bill To" area match the Customer Name.
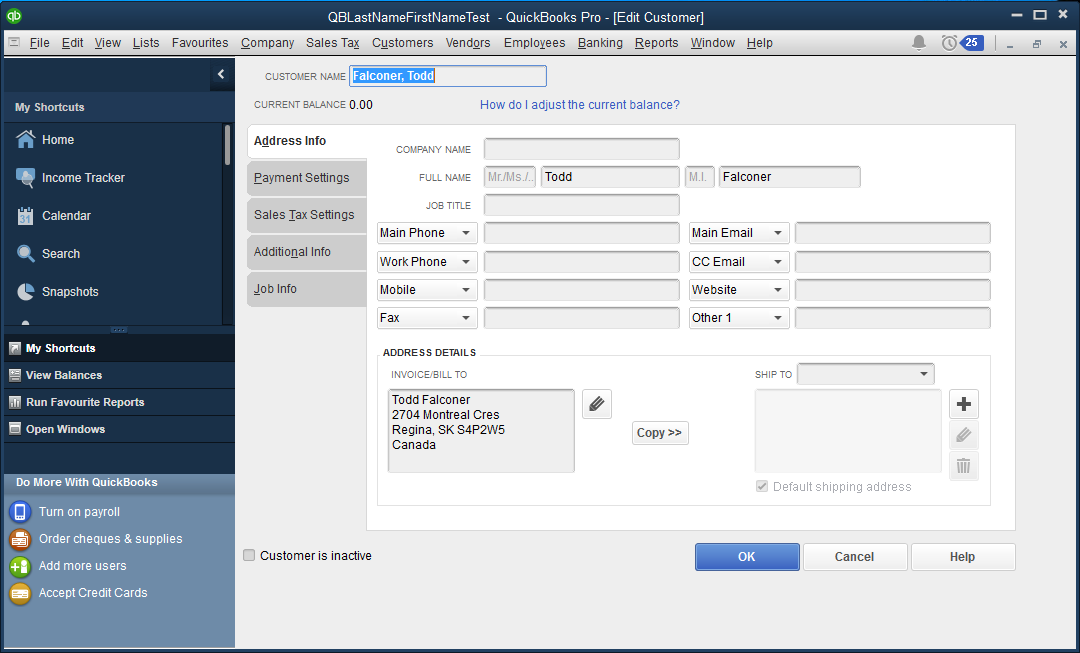
After making these changes, the address line one will appear correctly during import.
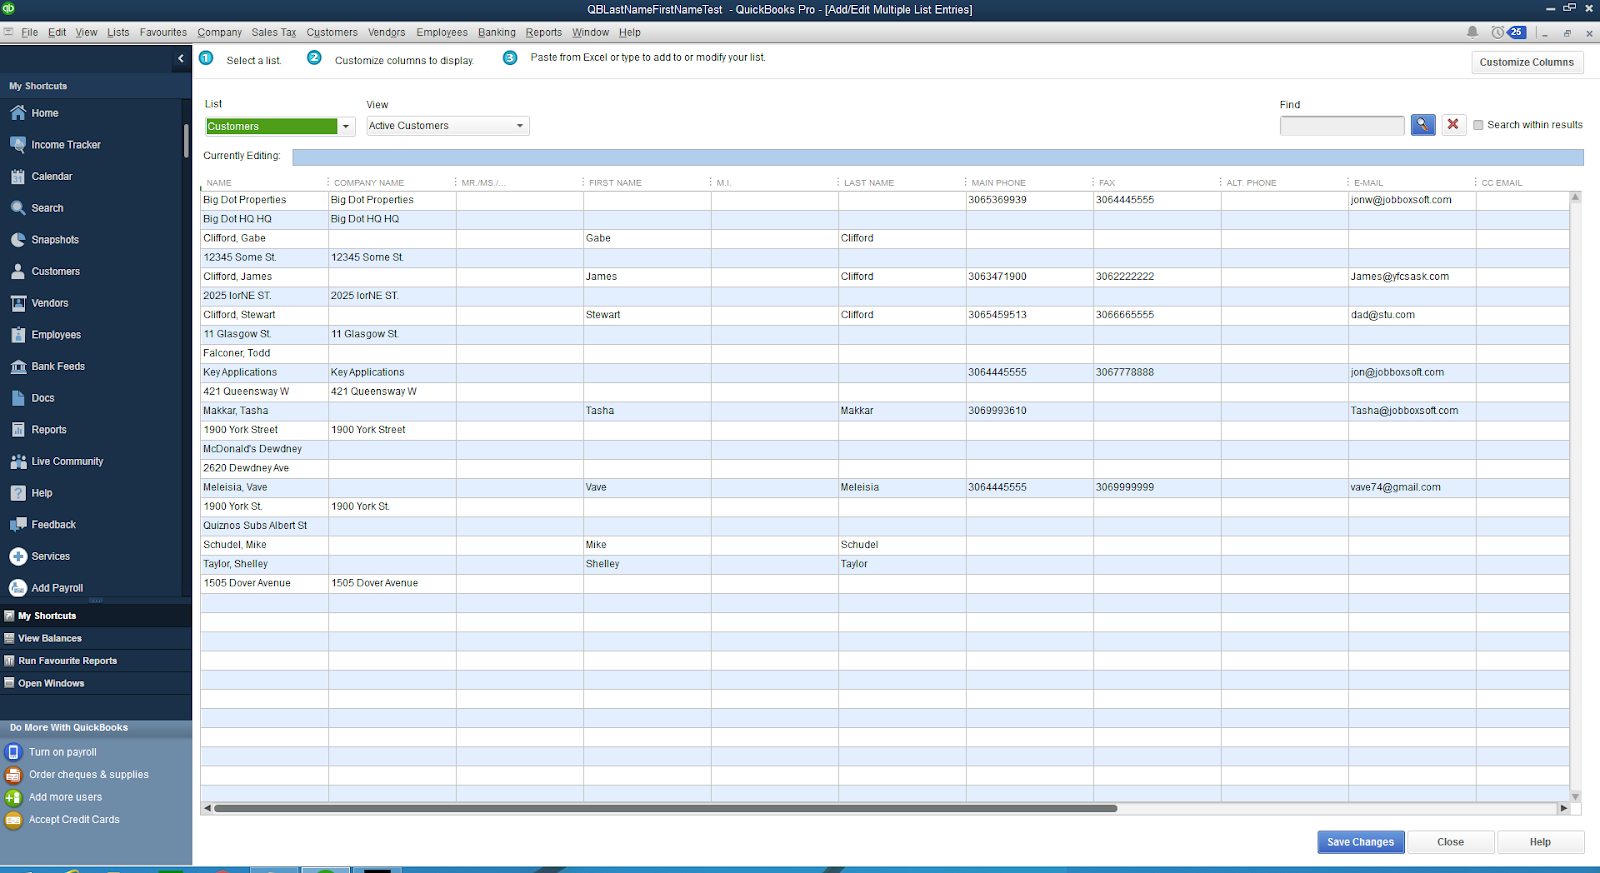
QuickBooks Mass Editing of Customers
If you are in a place where you want to quickly edit the Customers in QuickBooks you can do the following:
-
Go to Lists -> Add/Edit Multiple List Entries.
-
You will get a view that will allow you to edit the Customers quickly.

Processing the Import of Customers and Jobsites from QuickBooks to ServiceBox
Once you have all of the data in QuickBooks cleaned up and ready to go, we will be ready to start importing those customers and job sites into ServiceBox. It is important to set up the accounting connector so that it is configured according to how your QuickBooks file is connected.
In order to do this, you will need to:
-
Go through QuickBooks and make sure the data has been modified correctly.
-
Ensure the Accounting connector has been configured properly as per instructions here: Accounting Connector
-
Enter Settings in the Accounting Connector as per your QuickBooks file.
-
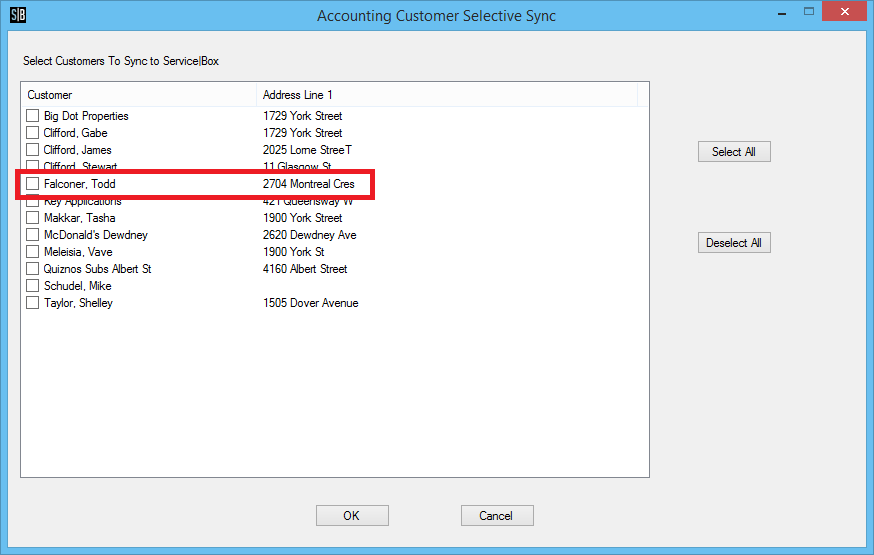
Click on Add/Update customers from accounting to ServiceBox. Choose “Selected customers only”. This will allow you to review the import and see which Customers from QuickBooks will be imported into ServiceBox. We will also be able to view some of the data that is going to be imported.
Need Help?
If you have any questions or need support, please click the Help button in your ServiceBox account or email us at support@getservicebox.com.