
Step 1: Create a New Vendor Order
-
Open the Work Order.
-
Click on the Vendor Order tab.
-
Select New Vendor Order. This opens the order form within the work order.

Fill in the following fields:
-
Order Date – Defaults to today’s date; you can update as needed.
-
Location – If Multi-Location is enabled, select from the dropdown.
-
Order Status – Defaults to Draft to allow editing. Learn more: Vendor Order Status Settings
-
Assigned To – Assign the vendor order to a user, if needed.
-
Vendor – Type to search your vendor list or use “Add Vendor” to create a new one.
-
Ship To – Defaults to your company address; adjust if needed using the dropdown.
-
Description – Add any relevant notes like delivery dates or payment terms.
Click Save to continue.

Step 2: Add Items to the Order
Go to the Order Items tab:
-
Add inventory or non-inventory items.
-
Fill in the item description, unit cost, quantity, taxes, and total.
Step 3: Email the Vendor Order
Before emailing, we recommend updating the order status to lock the items from further editing.
To email the order:
-
Click the Email tab in the top-right corner.
-
The To field will auto-fill from the vendor’s contact info, or you can enter it manually.
-
CC and BCC fields will populate based on your Vendor Email Setup.
-
Use the Attachment or Files tab to include additional documents, if needed.
-
Click Send Email to send the order to the supplier.

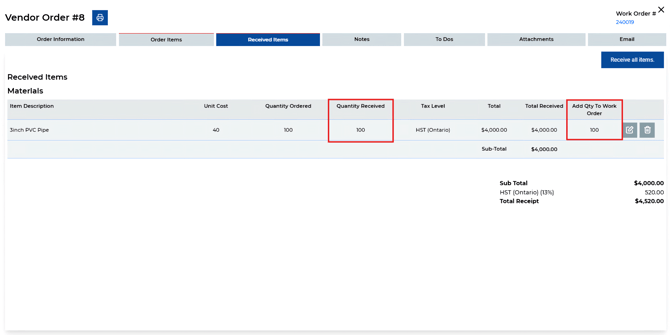
Step 4: Receive Items
When the items arrive:
-
Change the status to Received (label may vary depending on your company’s configuration).
-
A Received Date field will appear. Enter the delivery date.
-
A Received Items tab will open.
Within the Received Items tab, you can:
-
Enter the Quantity Received for each line manually.
-
Click Received All Items to receive everything at once.
To add received items to the work order:
-
Use the Add Quantity to Work Order field for individual items.
-
Or, select Received All Items, then check off Add all items to Work Order.
Note: If your order includes inventory items, the Received Location field will be required. Select the correct inventory location to process the receipt.


Need Help?
If you have any questions or need support, please click the Help button in your ServiceBox account or email us at support@getservicebox.com.