
Summary
This article provides an overview of the functionalities offered by the Work Order Tab within your ServiceBox settings. The Work Order Tab allows you to personalize and tailor various components of your Work Orders to suit your business’s needs.
Work Order Tab: Settings
As shown in the screenshot below, this subsection offers customizable features to be included and/or removed from your Work Orders.
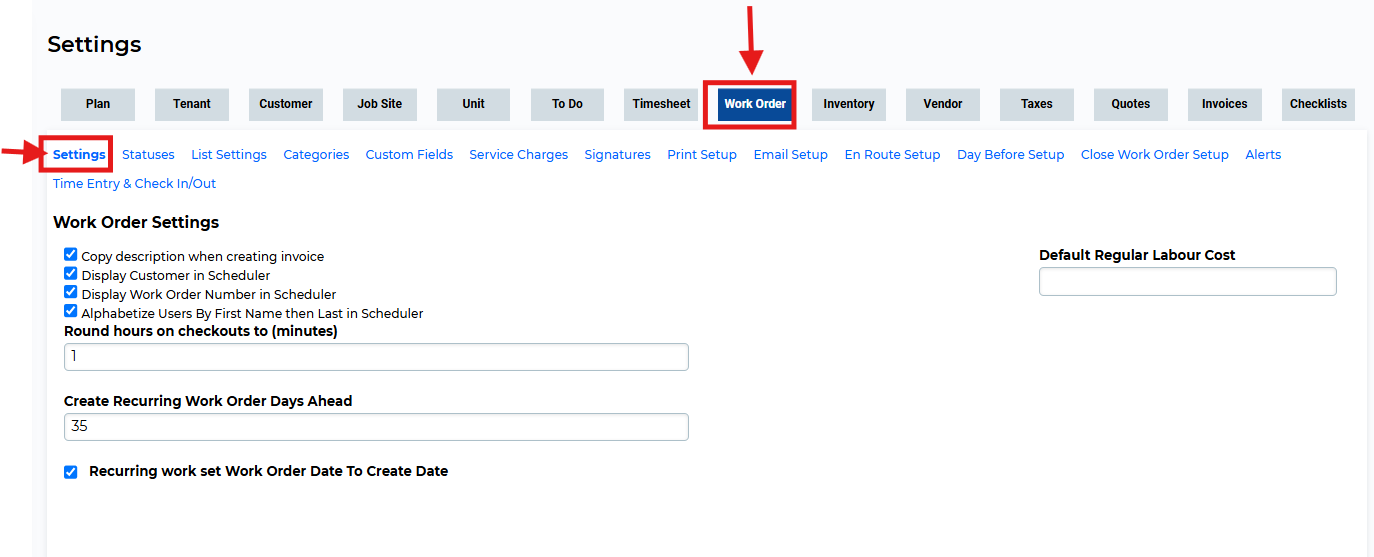
Work Order Tab: Settings
This subsection offers customizable features for your Work Orders.
Feature descriptions:
-
Copy description when creating invoice
Includes the Work Order description in any invoice generated from the Work Order. -
Display customer instead of Work Order number in scheduler
Displays the customer name in the scheduler instead of the Work Order number for clarity or personalization. -
Alphabetize users by first name on scheduler
Sorts ServiceBox users alphabetically by first name in the scheduler. -
Restrict check-in to one Work Order at a time
Prevents technicians from checking into multiple Work Orders simultaneously. -
Round hours on checkout to (minutes)
Rounds time entries to the nearest specified minute (e.g. 15, 30) for billing consistency. -
Create recurring Work Orders days ahead
Controls how far in advance recurring Work Orders are created and visible. -
Recurring Work sets Work Order date to creation date
Displays the date the Work Order was created rather than the recurring schedule date. -
Default Regular Labour Cost
Sets the default hourly labour rate for time billed on a Work Order.
Work Order Tab: Statuses
This section defines the lifecycle statuses of a Work Order. The order here determines how statuses appear in dropdowns and filters.
An example of the statuses subsection is included in the following screenshot below.
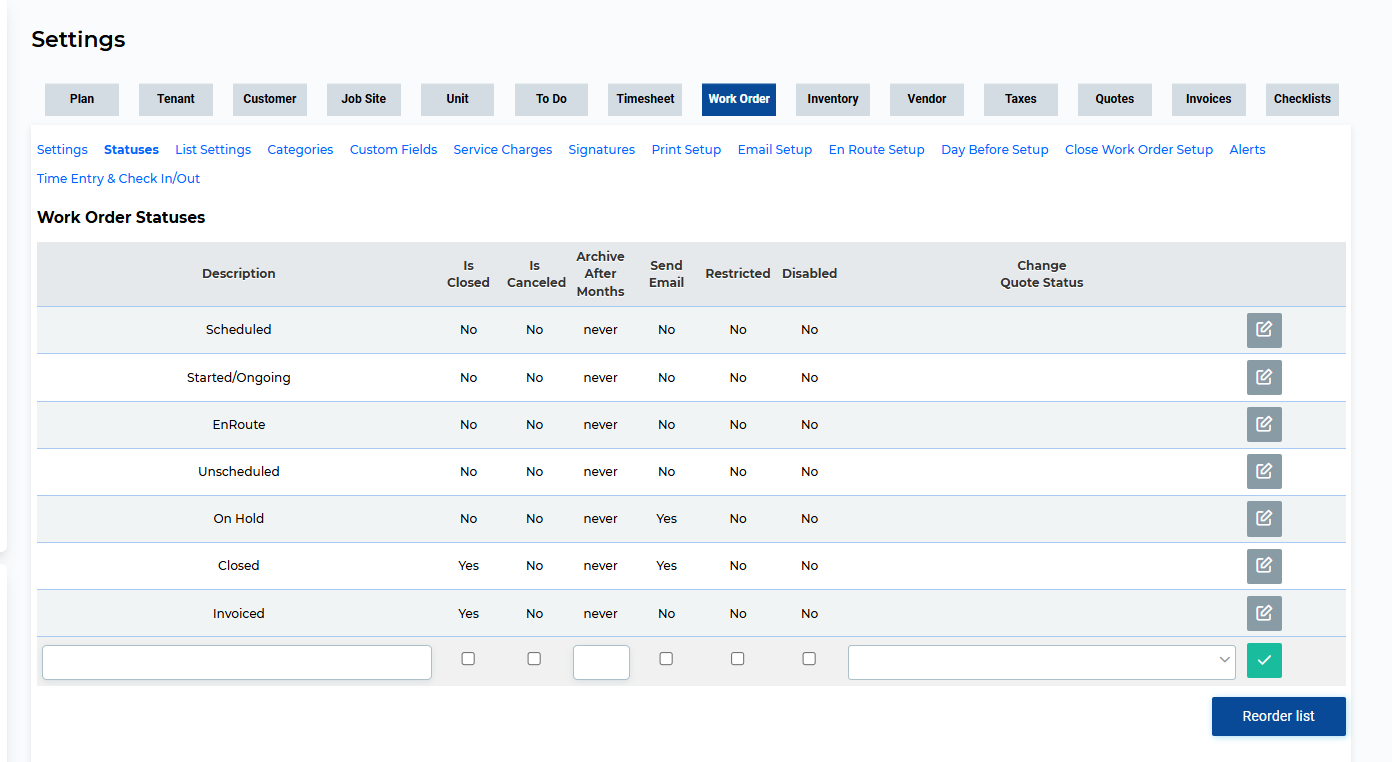
Customizable columns:
-
Description: The name of the status.
-
Is Closed: Marks the status as "closed" and triggers post-completion activities.
-
Is Cancelled: Marks the status as canceled.
-
Archive After Months: Automatically archives Work Orders after a set number of months.
-
Send Email: Sends an email when the status is changed (requires setup in "Close Work Order Setup").
-
Restricted: Limits access to this status to admin users only.
-
Disabled: Disables the status without deleting it.
-
Admin Only: Makes the status visible only to administrators.
-
Change Quote Status: Automatically updates a linked Quote’s status.
Tips:
-
Add statuses like "En Route" or "Reviewed" to match your internal workflows.
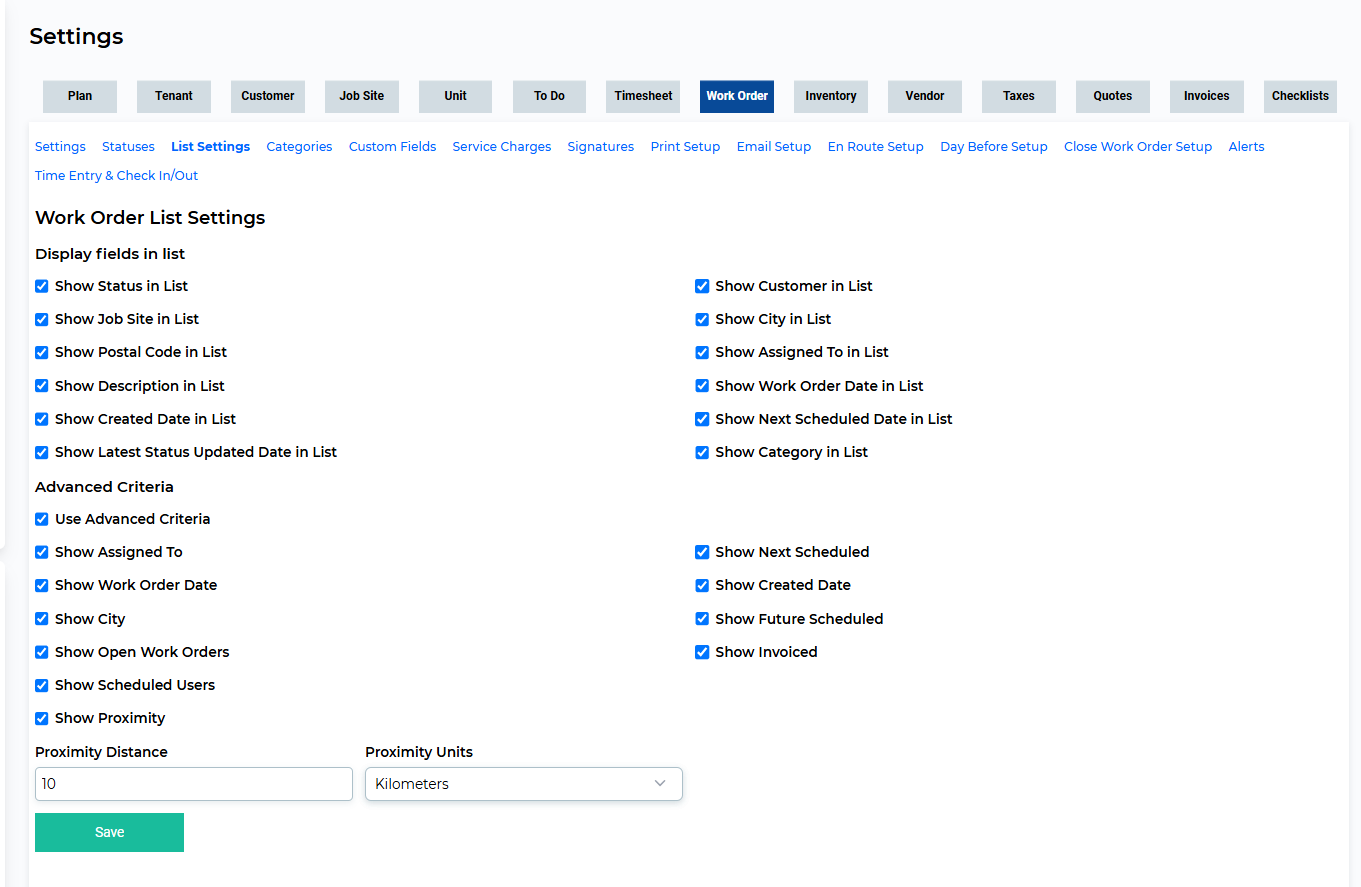
Work Order Tab: List Settings
Enabling these features allows for advanced filtering and sorting on the Work Order list screen.
Work Order Tab: Categories
Create categories to group Work Orders and recurring Work Orders. Assign a name and color to each category. These will appear in relevant dropdowns across the platform.
The screenshot below shows you some examples of Work Order categories.

Work Order Tab: Custom Fields
This subsection allows you to include custom fields in your Work Order. As shown in the screenshot below, each new custom field requires a name and a type, and ServiceBox includes additional features that can be added to custom fields (listed below)

Add custom data fields to your Work Orders.
Field types:
-
Multi-Line Text
-
Single-Line Text
-
Dropdown
-
Multi-Select
-
Checkbox
-
Date
-
Contact / Email / Phone (Customer or Job Site)
-
Linked fields (Contact, Email, or Phone linked to Customer or Job Site)
-
Restricted Dropdown or Multi-Select
Field settings:
-
Restricted: Viewable by admins only.
-
Display on Invoice / Print on Invoice: Controls visibility on the Work Order and print view.
-
Show on Scheduler / Work Order List: Enables visibility in these views.
-
Required to Close: Prevents closing without completing this field.
-
Restricted Print: Prevents printing the field to a client-facing PDF.
-
Use in Search: Allows the field to be used in Work Order filters.
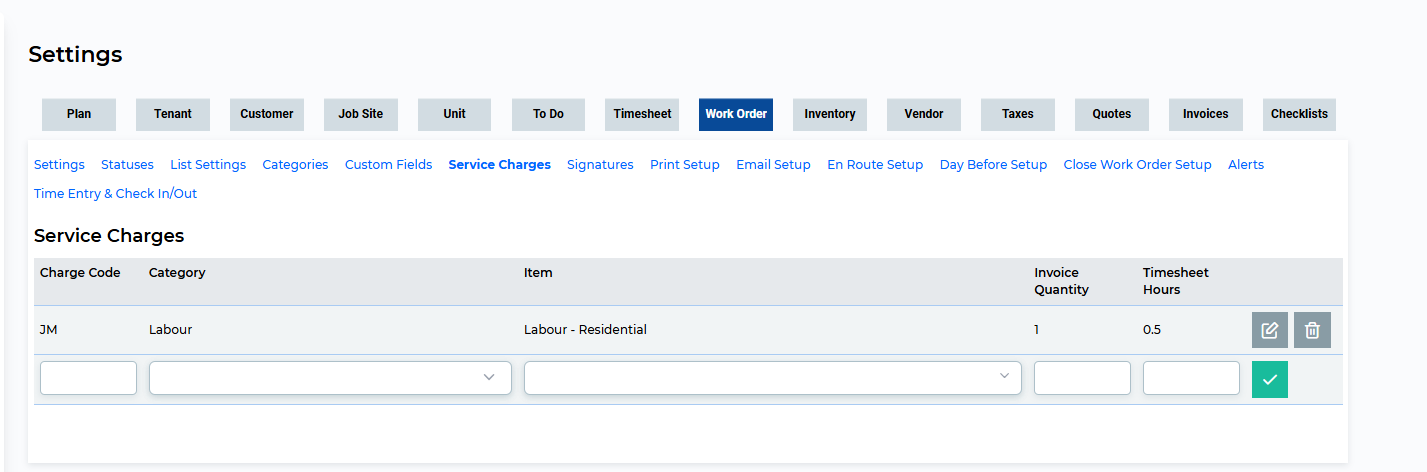
Work Order Tab: Service Charges
Service charges are codes applied to Work Orders that represent a flat fee or bundled charge.
To enable:
-
Go to Settings > Plan > Features and check off “Service Charges.”
Fields:
-
Charge Code
-
Category and Item
-
Invoice Quantity
-
Timesheet Hours (if the charge also affects a technician's timesheet)
Work Order Tab: Signatures
This subsection allows for your customers and employees to input their signatures and along with additional comments to be communicated. An example use-case of the Signatures subsection is shown in the following screenshot.

Collect customer and employee signatures.
Options:
-
Message for Customer / Employee
-
Require Customer / Employee Signature to Close
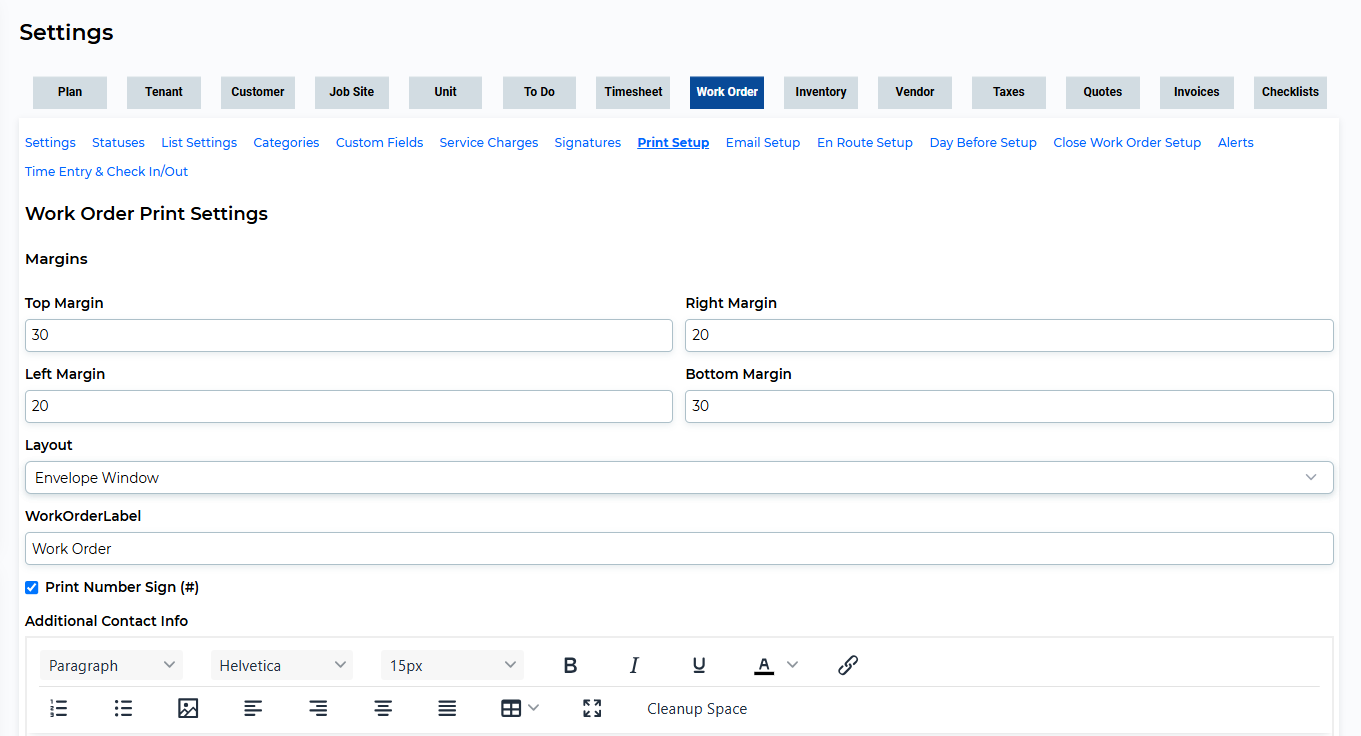
Work Order Tab: Print Setup
This subsection allows you to customize many of the items included when printing a Work Order. Any additions you add to this section of your Work Order print setup up, will automatically be set as your default print settings for your Work Orders.
As shown in the following screenshot, you can customize the format of your printed Work Order, by adjusting the margin size and layout. You can also choose whether or not to include your company logo on your printed Work Orders.
Work Order Tab: Email Setup
This subsection allows you to define default values for your outgoing emails regarding Work Orders. Any values set in this screen will load when a new Work Order email is created. An example is shown in the following screenshot.
Click here for more information regarding automated email templates.
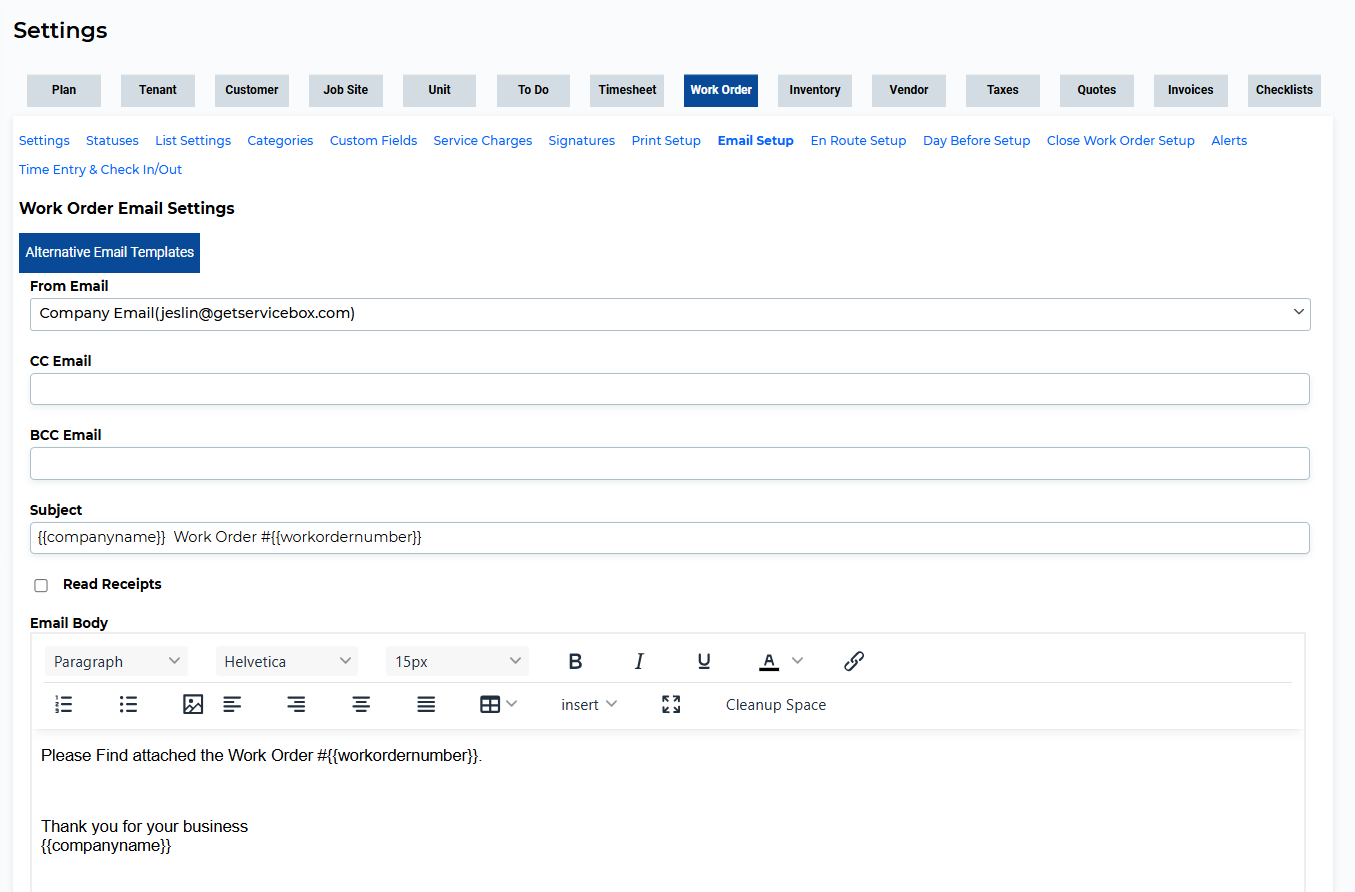
NOTE: If you check off "Read Receipts", it will send an automatic email notification to you, informing you that the recipient has read your email.
We have special fields that can be inserted into the subject line or the body of Work Order emails. You can insert these fields by clicking "insert" (highlighted in red in the above screenshot), and selecting the field you would like to insert. An example of this is . This will input the current Work Order number into the email, without requiring you to input the Work Order number yourself, saving you time! This feature may be used for the following inputs:
- Company logo:
- Company name:
- Company Address:
- Work Order Number:
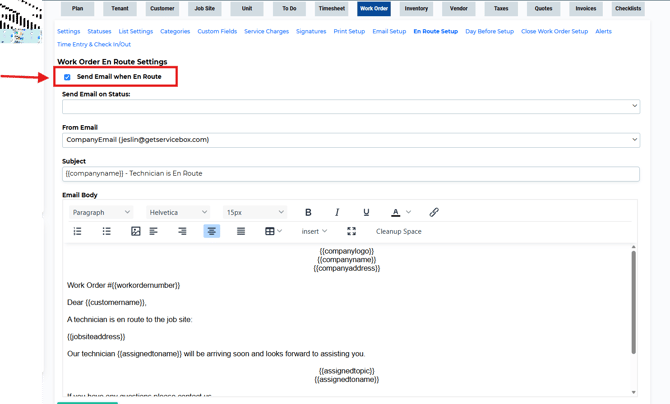
Work Order Tab: En Route Setup
This is a setting that will allow a user to send an email to a customer, informing them that a technician is on the way to the Job Site. This is triggered by a status change and on the Status change an email will be sent. The email formatting, (including shortcuts to include certain values), and the same as the email settings in the above subsection.
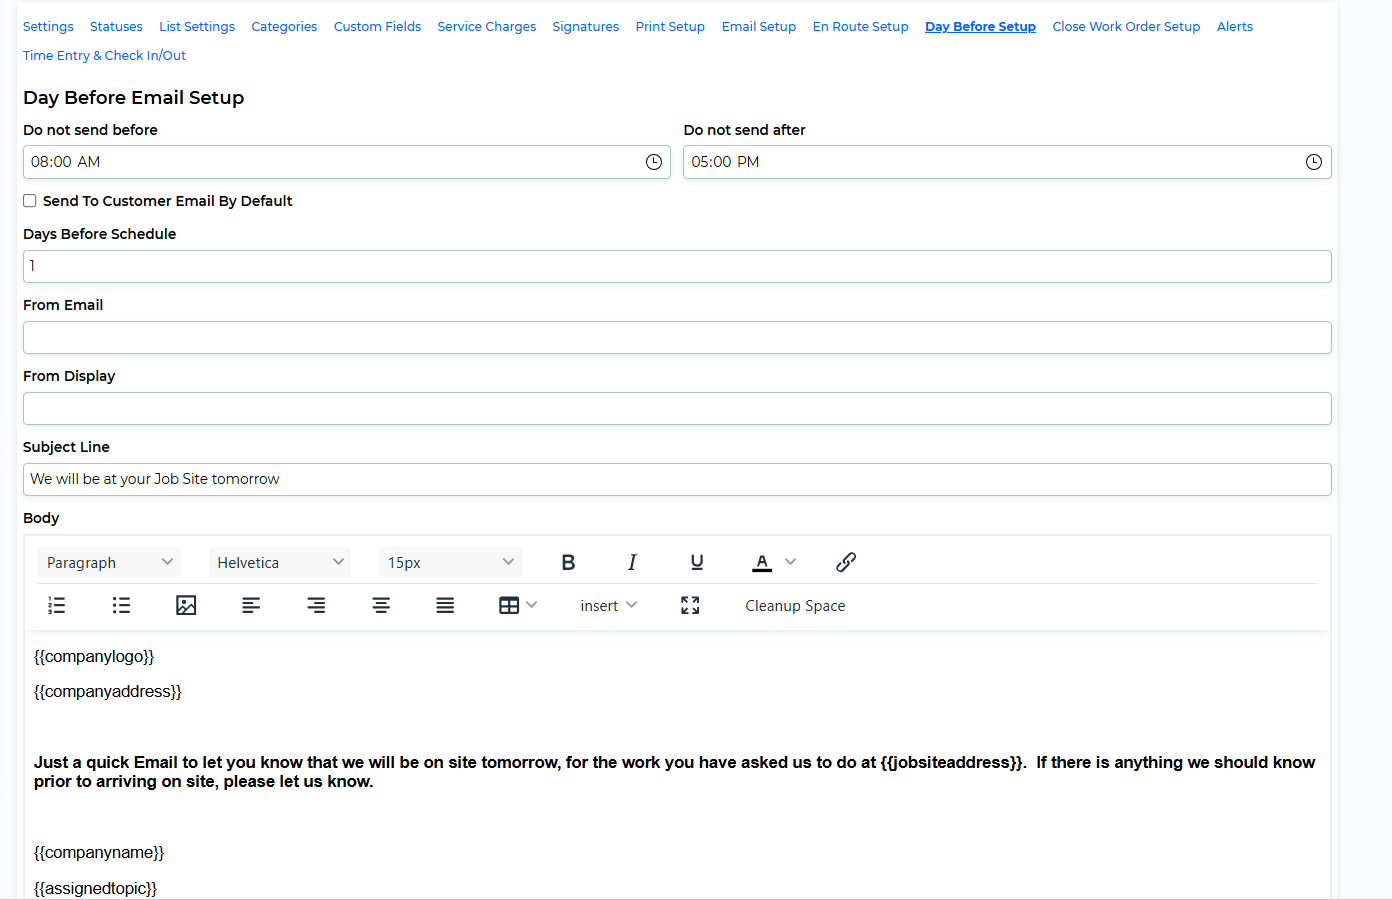
Work Order Tab: Day Before Setup
A way of sending an automatic email notification to customers. The notification could be sent on the basis of the technician's scheduled date. Select the amount of days prior to the scheduled date that you would like the email notification to be sent to the customer. You can then define the body of the text that will be emailed to you customers.
NOTE: Check "Send to Customer Email by Default" if you would like to send a day-before notification to all of your clients.
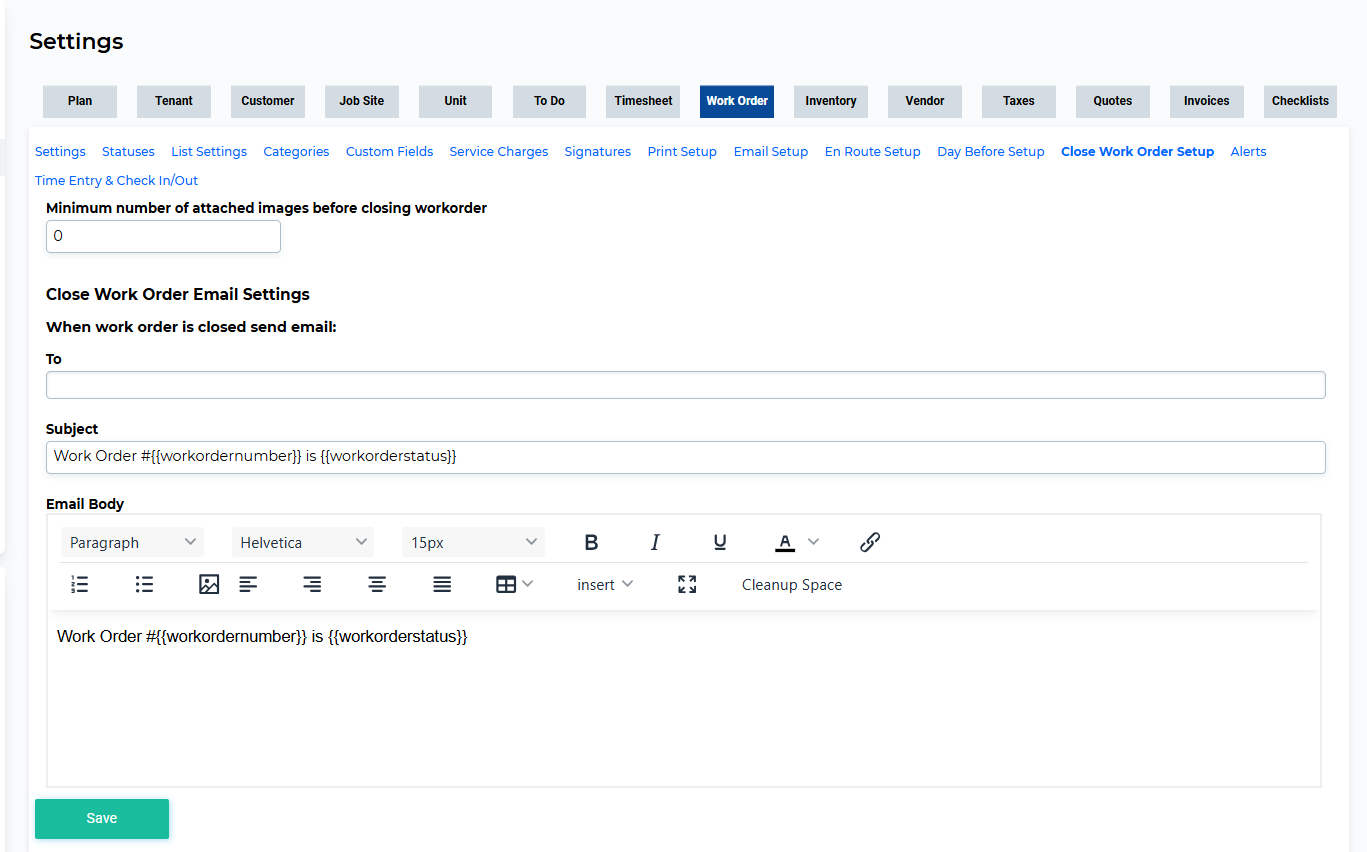
Work Order Tab: Close Work Order Setup
If the user wants to send an email within the company once the Work Order is set to “Closed” they can enter the settings in this subsection. The email formatting, (including shortcuts to include certain values), and the same as the email settings in the above two subsections.
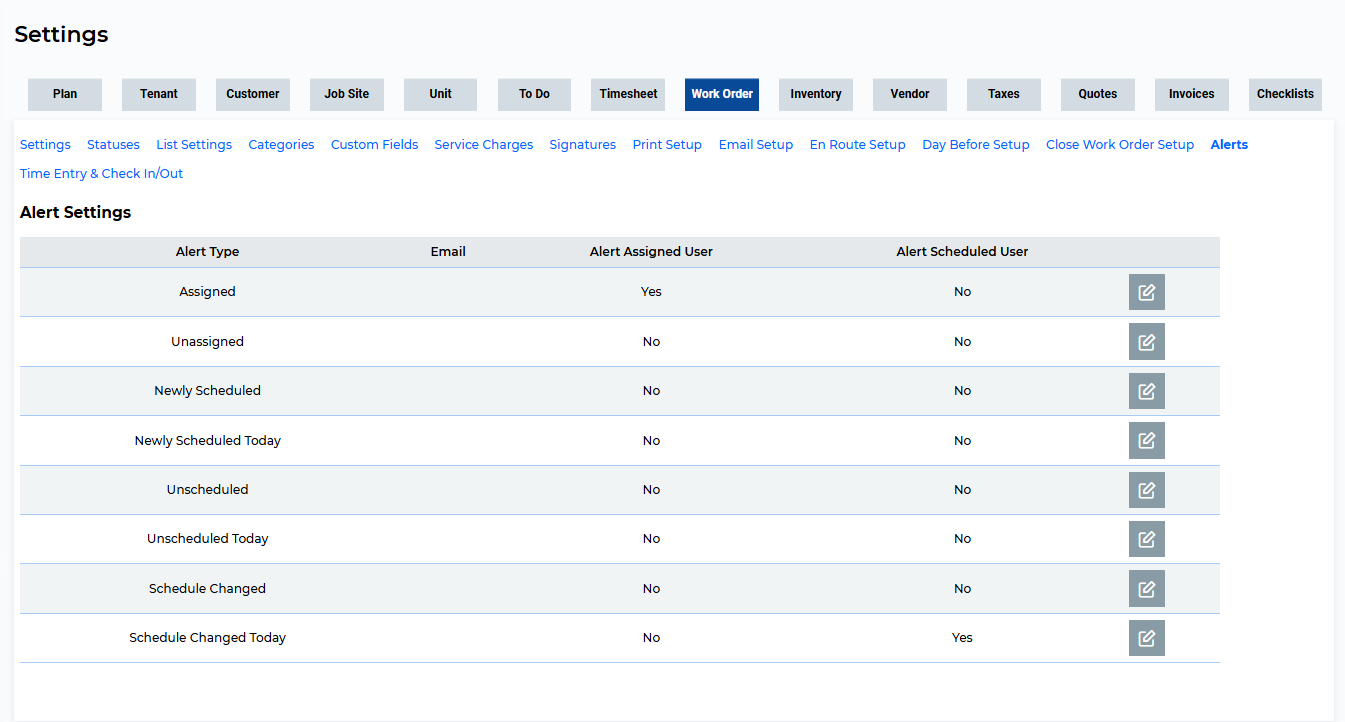
Work Order Tab: Alerts
This subsection allows notifications of a Work Order's change of status to be sent to a ServiceBox user and/or company email address. An example is shown in the following screenshot.
Note the difference between an "Assigned User" and a "Scheduled User:
The Assigned User is not necessarily an individual who actual does any physical labour on the Work Order to complete the "job". They may be a Project Manager or Foreman for the "job". It is the person who is responsible to see that the job is Closed and that the company can then Invoice the Work Order, and create revenue.
The Scheduled User is the person who will do the physical work on the Work Order/job. That said, in most smaller companies ServiceBox has as clients, the Assigned User may very well be the Scheduled User on the Work Order, to work on and complete the "job".
Work Order Tab: Time Entry & Check in/Checkout
This section allows for your employees to indicate the status of a Work Order upon checking in and checking out of a Job Site. This saves times for your technicians, rather than manually changing the Work Order Status.
An example can be seen in the following screenshot.
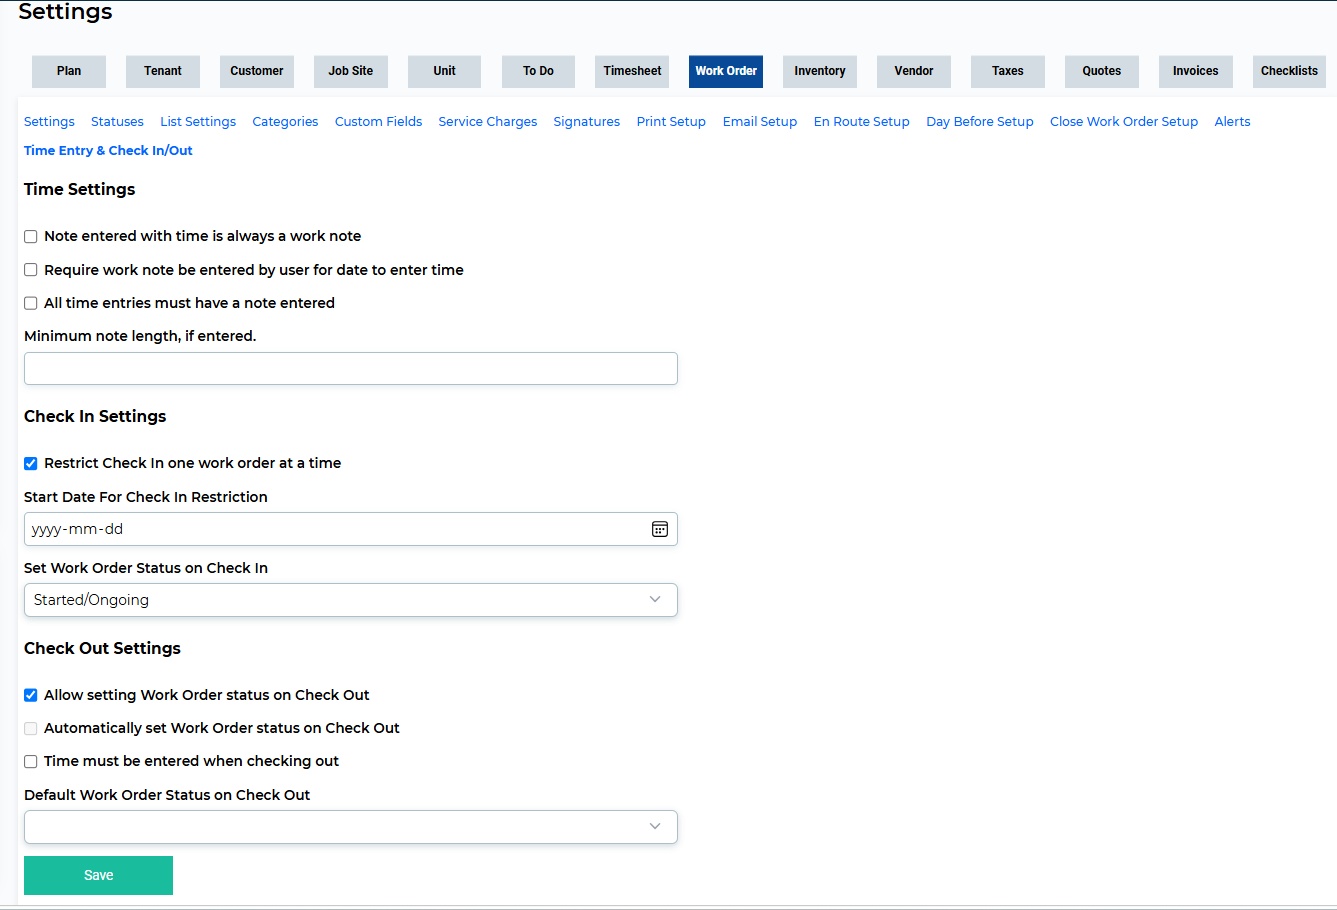
- Automatically set Work Order status on Checkout
- This automates the process of changing a Work Order status upon checking out, saving time for your technicians.
- Allow setting Work Order status on Checkout:
- This allows your technicians to choose the Work Order status on checkout. Your technician will be able to choose the status of a Work Order on checkout. The reason for this is because your Technicians may know the status of a Work Order better than anyone, so this allows them to ensure the status of the Work Order is accurate when they check out.
Need Help?
If you have any questions or need support, please click the Help button in your ServiceBox account or email us at support@getservicebox.com