
Summary
This document will go over the process for your business to get a Merchant Account so that you can take credit card payments for invoices created inside of ServiceBox.
For complete details about ServiceBox Payments, please see the details here.
Enable ServiceBox Payments
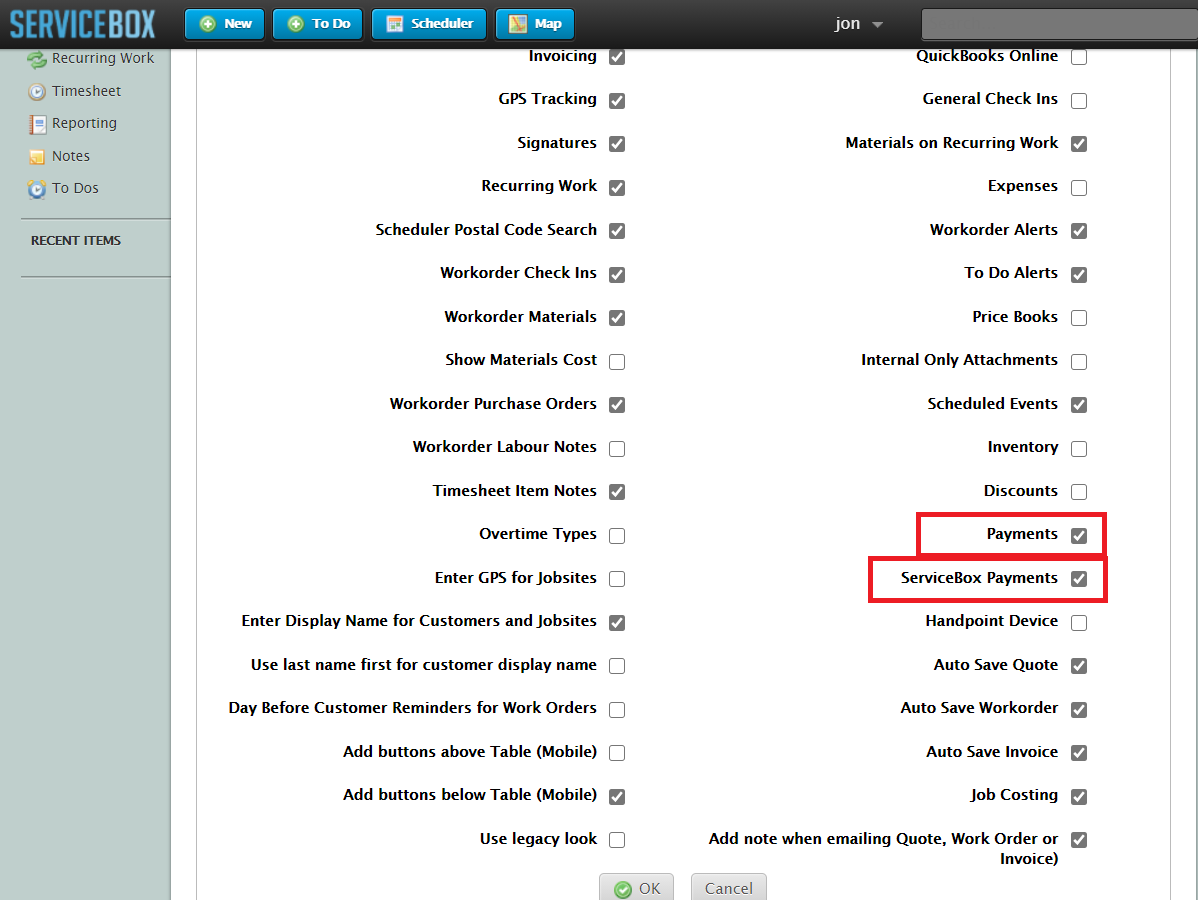
The first step to begin taking payments through ServiceBox is to go into your settings and enable ServiceBox Payments. To do this, go to Username > Settings > Plan > Features. You will need to have both the Payments option as well as the ServiceBox Payments option selected, as shown in the screenshot below. Once both are checked, click the OK button.
Confirming ServiceBox Payments is on
Once you enable ServiceBox Payments, you can confirm that it is turned on by going to Settings > Invoices > Payments. If you have not applied for a Merchant Account before, you will see a button that says Apply for ServiceBox Payments Merchant Account. We will go over what is required to apply in the following sections.

Information Required to Apply for a Merchant Account
In order to apply for a Merchant Account, we will require some information about your company, owners, and your bank account details.
Here is a list of documents you should have ready to complete your application:
1. Company Details
-
Legal Entity Name
-
Federal Tax Number
-
Business Details – Address, Type, Online presence, etc.
2. Business Owner Details
-
Must include information on all owners that have 25% ownership or more.
-
Each owner will need to provide:
-
Personal Details: Name, Address, Phone, Date of Birth, SIN
-
Driver’s License Details
-
Current Address (and previous addresses up to 3 years)
-
3. Bank Account Details
-
Institution ID
-
Transit Number
-
Account Number
Once you have gathered this information, you are ready to apply for your Merchant Account. If at any point you realize you are missing some info, you can save the application process and return later.
Applying for a Merchant Account
To complete the application, return to Username > Settings > Invoices > Payments. Click the Apply for Merchant Account button. The application process will begin with the following screen.
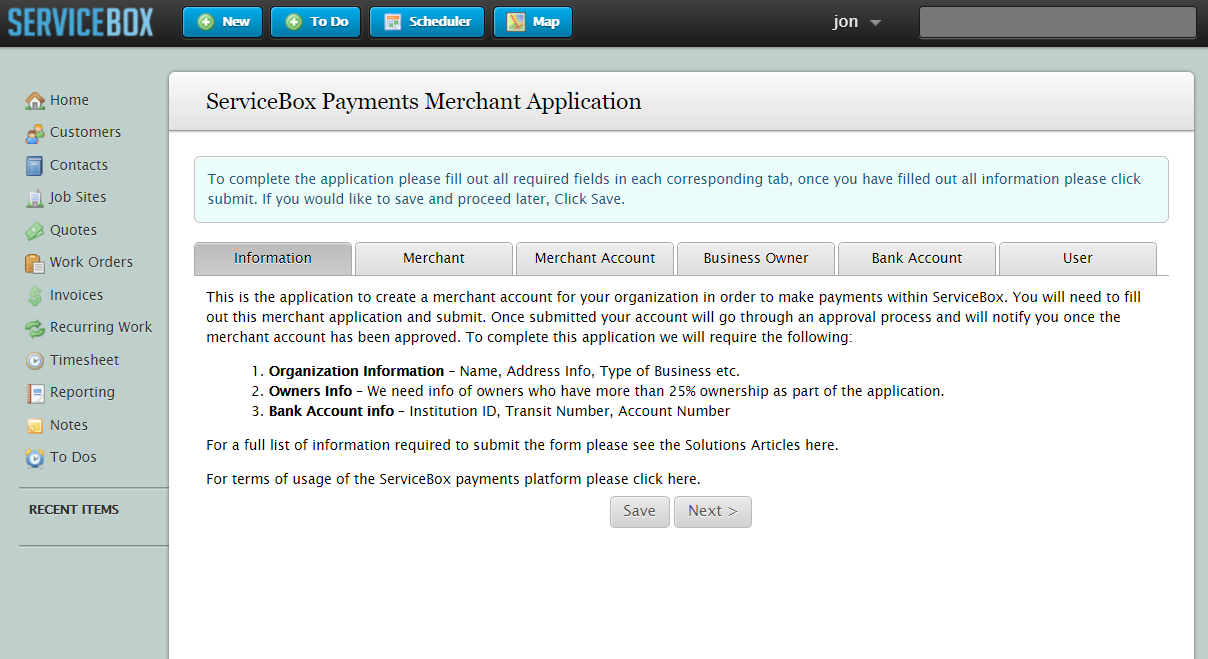
You’ll be able to save your progress as you go. If you can’t complete the process in one sitting, you can return to it later.
As you go through the process, fields marked with a red indicator are required.
Merchant Tab
This is the tab to enter the details about what your merchant account will be called.
-
Merchant Name – Typically the name of your company

Merchant Account
In this tab you'll add the details related to your organization.
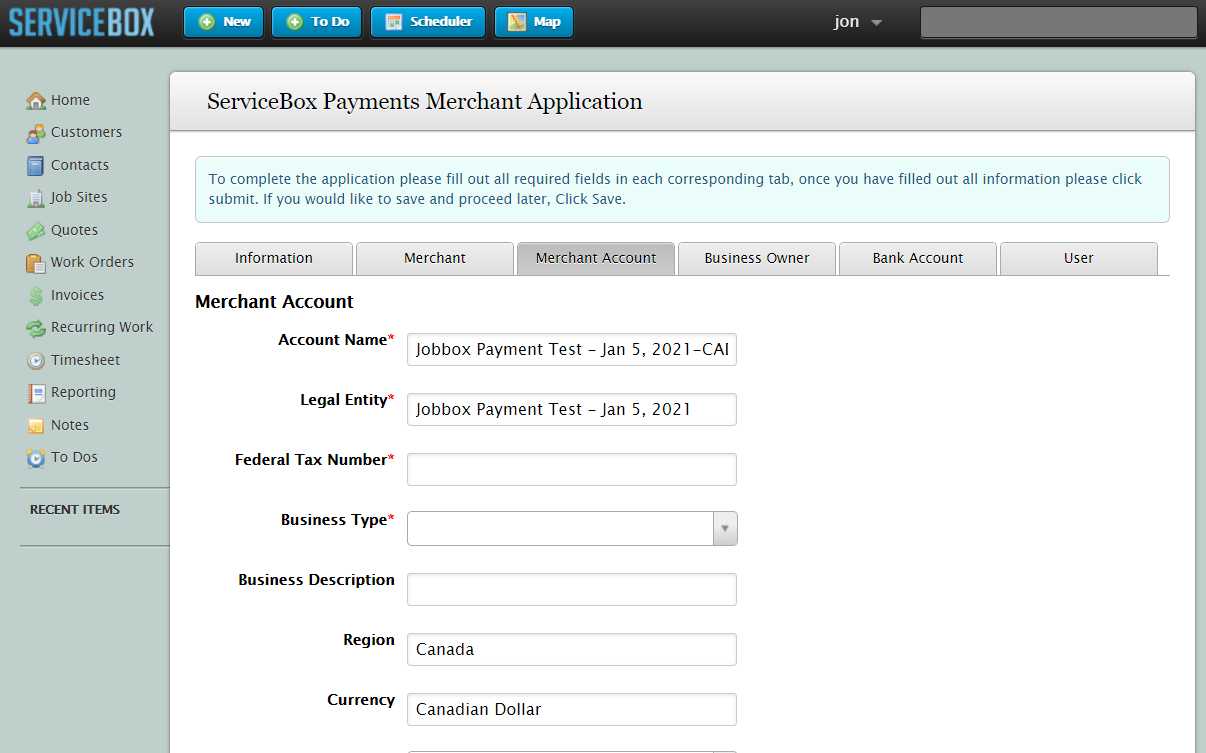
-
Account Name – Required
-
Legal Entity – Required
-
Federal Tax Number – CRA Business Number (Canada) / Tax Identification Number (USA)
-
Business Type – Required
-
Business Description – Short description of your services
-
Region – Defaults based on location
-
Currency – Defaults based on location
-
Category – For most users, this will be Trade Contractor. Required
-
Phone – Required
-
Email – Required
-
URL – Company web page (optional)
Credit Account Info
-
Yearly Volume Range – Required
-
Average Transaction Amount – Required
-
Account Descriptor – Name appearing on credit card statements. Required
-
Account Descriptor Phone – Required
-
Has Previously Processed Cards – Optional
-
Do You Wish to Apply for Visa and Mastercard Debit – Optional
Trading Address
Enter your company’s address: Address, City, Province/State, Postal Code.
Business Owner
Enter details for all business partners owning more than 25% of the company. Click Add Owner to include multiple owners.
Required fields:
-
First Name, Middle Name, Last Name
-
Job Title, Email, Phone
-
Date of Birth, SIN/SSN
-
Percent Ownership
-
Is Applicant – Select one responsible applicant
-
Is Control Prong (USA Only) – For defining beneficial ownership
Drivers License
Required fields:
-
License Number, Issue Date, Expiry Date, Province/State
Current Address
If the owner has lived at their current address less than 3 years, enter previous addresses to cover the full 3-year period.
-
Years at Address, Street, City, Country, Province/State, Postal/Zip Code
Click Add Previous Address to enter additional history.
Agreement
To continue, you must agree to the following:
I represent and warrant that I have provided accurate information with respect to each Director/Trustee.
Bank Account
This tab is used to enter your bank information for payment deposits.
Required:
-
Institution ID
-
Transit Number
-
Account Number
You can find these on a void cheque or from your bank.
User
This section sets up your login credentials for the Merchant Account portal.
Required:
-
Username – Will be prefixed with
servicebox- -
Email
-
Password, Confirm Password
-
Recovery Question and Answer
Saving and Submitting your Application
To save your application and return later, click Save.
Once completed, click Submit to send your application. You will receive a confirmation email once approved. You can check the status under Settings > Invoices > Payments, in the field: Application Status.
Validating Your Bank Account
The field Bank Account Validate is used to verify your bank account with a micro deposit.


Need Help?
If you have any questions or need support, please click the Help button in your ServiceBox account or email us at support@getservicebox.com.